First contact: the MCP Inspector
Drive someone else's server before you write your own
You could start by writing a server. Most tutorials do, and it is the wrong order, because you would be writing against a protocol you have never watched work. Better to spend one lesson driving a server somebody else wrote, with a tool that shows you the protocol and the product at the same time.
That tool is the MCP Inspector, the reference client for testing and debugging servers. It needs Node 22.19.0 or newer and runs through npx with no installation:
npx @modelcontextprotocol/inspector npx -y @modelcontextprotocol/server-filesystem ~/notesRead that command carefully, because its shape is not obvious. Everything after npx @modelcontextprotocol/inspector is the command that launches the server. You are not passing the Inspector a URL or a config file; you are telling it how to start a subprocess and then speak stdio to it. Here that subprocess is the official filesystem server, scoped to ~/notes.
It prints a URL containing a one-time session token. Open it and you get a graphical client: a list of the server's tools with their schemas, a form to call one, the resources it exposes, and a monitor showing the raw JSON-RPC going both ways.
The mechanic's diagnostic port
Every car built in the last thirty years has a port under the dashboard that nobody uses for driving. It exists so somebody can plug in and ask the engine directly what it thinks is happening, rather than inferring from the noise.
For a beginner that is the useful picture: the Inspector is the thing that reads the fault codes. For anyone who has debugged a service, the sharper statement is that it is curl for a protocol you do not yet have a client for — and like curl, its real value is that it removes your own code from the question. When a tool misbehaves in Claude Desktop, the first thing to establish is whether the server is wrong or the integration is, and the Inspector answers that in one command.
Three clients behind one binary
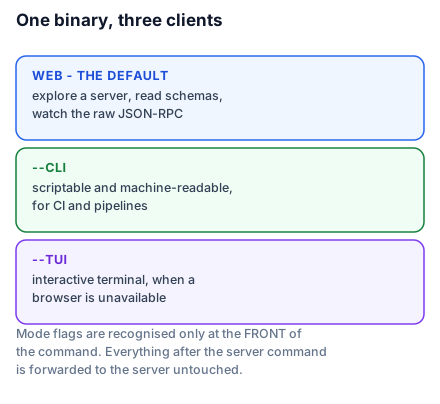
The same package ships three interfaces, chosen by a flag.
- Web is the default and the richest.
npx @modelcontextprotocol/inspector <command>opens the browser UI. - CLI is scriptable and machine-readable, for CI and shell pipelines.
- TUI is an interactive terminal interface, for when a browser is unavailable or unwanted.
All three share one core, so a connection behaves identically across them — same transports, same config files, same stored OAuth state.
The CLI is the one worth learning properly, because it turns protocol inspection into something you can put in a script:
npx @modelcontextprotocol/inspector --cli npx -y @modelcontextprotocol/server-filesystem ~/notes \
  --method tools/list
And calling a tool, with the result piped somewhere useful:
npx @modelcontextprotocol/inspector --cli npx -y @modelcontextprotocol/server-filesystem ~/notes \
  --method tools/call --tool-name read_file --tool-arg path=~/notes/todo.md --format json | jq .
Arguments go in one at a time as --tool-arg key=value. --format json gives you something jq can read, which is what makes this usable as a smoke test — Lesson 21 puts exactly this command in a test suite.
For a remote server there is no subprocess to launch, so you point it at a URL instead:
npx @modelcontextprotocol/inspector --server-url https://api.githubcopilot.com/mcp/ --transport httpThe flag position rule that will cost you an hour
mcp-inspector is a thin launcher wrapping three clients, and it owns exactly two things: the mode flag (--web, --cli, --tui) and --help. Everything else — --method, --server-url, --transport, --tool-arg — belongs to the client, not the launcher.
The consequence is a parsing rule that is easy to violate and produces a confusing failure: mode flags are only recognised at the front of the command line. The first token that is not a mode flag ends launcher parsing, and everything after it is forwarded to the client untouched.
So this runs the CLI, and the trailing --cli is passed through to your server as one of its arguments:
npx @modelcontextprotocol/inspector --cli node server.js --cliThat behaviour is deliberate and useful — it is what lets your server have an argument that happens to collide with a launcher flag. But put --cli after your server command by mistake and you get the web UI while swearing you asked for the CLI. When the Inspector ignores a flag, check its position before you check anything else.
--help behaves the same way. Bare --help prints the launcher's help; --cli --help prints the CLI's full flag reference, which is the one you usually want.
Reading a tools/list by hand
Point the Inspector at any published server and read one tool definition properly. Not to memorise the JSON — you saw the shape in Lesson 6 — but to see how a production server writes a description.
Good descriptions say when to use the tool, not just what it does. "Read a file" is a name; "Read the contents of a file. Use when you need the actual text rather than just checking existence." is a description. The model has nothing else to go on, and Lesson 15 is largely about writing these well.
Read a few input_schema blocks too, and notice how often a parameter carries a description of its own. Every one of those is a place a model would otherwise guess.
What to take into the next lesson
The Inspector is one binary with three clients: web for exploring, --cli for scripting and CI, --tui for a terminal. Everything after the server command is forwarded to the server, and mode flags only parse at the front. Use it to remove your own code from any question about whether a server works. Next: connecting servers to the tool you actually work in.